Wednesday, December 24, 2008

Cookie exchange loot

"Think what a better world it would be if we all, the whole world, had cookies and milk about three o'clock every afternoon and then lay down on our blankets for a nap."
~ Barbara Jordan

Now I thought I'd share with you the yummy cookies I got to take away from the cookie exchange! Prepare to feast your eyes.


Starting with the upper right corner in my tin with the brown dollop - peanut butter tarts with chocolate filling, moving clockwise, chocolate cake bites, oatmeal raisin (the big cookie), cranberry white chocolate chip (the small cookie), cherry cookies, chocolate chip cookies (in the top left corner), magic cookie bars, and cranberry, chocolate chip, macadamia nut cookies.

It was so much fun, and all of the cookies were very very tasty!

I hope you all have a festive and safe holiday!

Tuesday, December 23, 2008

Give-away week 4 winner!


The winner of the salt scrub from give-away week 4 is Sarah! Congrats!!!

Thank you everyone for leaving your comments I loved reading all about your favorite holiday treats! So much so that I was inspired to spend the weekend baking! Yum! (holiday goodies post tomorrow!)

I also want to say thanks so much to everyone who commented on my give-away series! I love reading your comments, and I hope you'll all continue to read and comment copiously! It's so fun to hear what you have to say and it's nice to know that people are reading!

Monday, December 22, 2008

Holly cookie recipe and tutorial

"Approach love and cooking with reckless abandon."
~Dalai Lama

This weekend I went to a cookie exchange party. Everyone brought 3 dozen cookies, and we each got to take some of each cookie home! It's a great way to exchange recipes and try new delicious cookies! I decided to make my absolute favorite holiday cookie that's extremely easy, quite beautiful, and very tasty - holly cookies.

This is all you need to make them!
30-40 big marshmallows (it's basically 1 bag of marshmallows, so you could get small ones if you wanted)
1/2 c of butter or margarine
vanilla extract
green food coloring
5 cups of cornflakes
red hots

All you do is blend the butter and marshmallows together over low heat.

After all the marshmallows have melted add in 1/2 tsp of vanilla.
I love using my pure vanilla extract from Tijuana, Mexico, but because it's unlikely that I'll be back there anytime soon to replenish my supply I use it in only the most special of recipes, like this one!

Then add in your food coloring. I start with a few drops and then stir it, adding more until you like the color.


Don't add too much though, it WILL turn your tongue green! :)

Next fold in the cornflakes until each one is coated with the marshmallow mixture.


Drop by spoonfuls onto wax paper.

For some reason, red hots are always the most difficult ingredient for me to find. I always forget this and every year it amazes me just how tricky they are to find. This time I had to check Target and Walmart before I finally found them at Winn Dixie.

Anyways, you place 3 red hots on top of each cookie,


and there you have it, beautiful holly cookies topped with berries!

I will mention that I always pick the red hots off and eat them separately from the cookie. The cinnamon flavor and sugary marshmallow mixture are not particularly complementary in my opinion, but the red and green sure are beautiful together!

Tomorrow I will share with you the yummy cookies I got to take away from the exchange!

Friday, December 19, 2008

Give-away: Week 4.

"Beauty is only skin deep, but ugly goes clean to the bone."
~Dorothy Parker

Sorry this took so long but I finally got the 4th and final giveaway prepared. Things have been crazy hectic with Christmas coming so I was a bit slow. But I made it just before the week ended, barely.

So what is this week's giveaway? You ask? A beautiful jar of hand-made scented salt scrub made with epsom salts, olive oil, and a blend of essential oils called escape. It's all natural and feels and smells great!


One lucky reader who comments on this post telling me about their favorite holiday cookie/sweet (yes I know it doesn't really go with the prize, but I want to know about yummy things!) will win the jar of salt scrub. Sadly it won't make it by Christmas but I purposefully made it non-Christmas-y to enjoy all year round! Leave your comment by noon on Sunday Dec 21 to be entered in the random drawing. As always, make sure you leave some way for me to contact you in case you're the winner!

I really can't wait to read about your holiday cookies! This weekend is a baking weekend for me, so I'll tell you all about my holiday goodies next week!

Wednesday, December 17, 2008

Christmas Alphabet Soup meme

"Photography is a way of feeling, of touching, of loving. What you have caught on film is captured forever... it remembers little things, long after you have forgotten everything."
~Aaron Siskind

Kristen at Something about nothin has introduced me to and included me in a fun game:

You get a letter and list 10 things that start with that letter. She had to do Z, eep! She, however, gave me S. What a great letter! Thanks Kristen!

So since it's Christmastime she's changed the game into a Christmas game. That means I have to list 10 Christmasy things that start with the letter S. No problem! I can think of 10+ right off the top of my head. So to make it a little more challenging I'm going to use 10 pictures from my own photo album that I haven't used on here already.

Now in a game of Scattergories some of these would probably be contested, and I wouldn't win, but considering I wanted to use all photos that I've taken and not take any from the internet I took a little creative license. (sadly I'm fresh out of photos of sleighs, and I already used my stocking picture in a previous post.) So here goes:

Santa

Snow

Shopping

Storytime

Stacks of presents


Skiing

Sweets


Sugar cookies


Snowman

Seven-swans-a-swimming
ok fine, you can only see three in this picture, and they're actually more like pink flamingos, but paddle boats are USUALLY swans, so I say it counts. :)

No? Fine...one more then...

Shipping

That was really fun! Thanks again Kristen!

If you'd like to play, just ask me for a letter. You can adapt the game however you wish, and since Christmas is almost here you don't even have to do the Christmas part if you don't want. :D

Friday, December 12, 2008

Give-away: Week 3 Winner!

Thanks again to everyone who entered the santa n' friends ornament give-away for this week! Only one could win, though, and that person is Holly! Congrats Holly! I need you address so I can send out your ornaments!

Don't forget to check back Monday for week #4's fabulous give-away! Less that 2 weeks left til Christmas!! :o

Thursday, December 11, 2008

Advent Calendar

"During this Advent season as we celebrate the new relationship between God and his people, may that be mirrored in our renewed relationships with spouses, children, family and those near and dear to us. May we speak tenderly to each other amidst all the rush of the season and transform the shopping days till Christmas into the true Advent of Christ. "
~Casely Essamuah

When I was growing up one of my favorite holiday decorations was a felted applique advent calendar that my mom had made. It was a felt Christmas tree, with 24 pockets below it, and in each pocket was a felt ornament. Each day of December before Christmas we took out an ornament and pinned it onto that felt tree. We always fought over who got which days (since there were 4 of us), but I always got Dec 16 - my birthday. I don't know what happened to that advent calendar. Eventually my mom quit putting it up. I couldn't believe it when I found this one, and so I'm making it:


Sorry the picture is so small. This advent calendar is SOO close to what I remember having growing up. Mainly the ornaments. The star on the top, the candle, the angel, the soldier boy, the bear, the stocking, the drum and the ball ornament (both still in their pockets), are exactly the same, at least to the best of my memory. Some of the others look vaguely familiar too. I've seen other felted advent calendars that are very cute, but this one reminds me of not just Christmas but a family Christmas tradition from my childhood. I can't wait to finish it and hang it up (though I'm sure I won't finish it in time for this year.).

Wednesday, December 10, 2008

snowflake tutorial

"Forests, lakes, and rivers, clouds and winds, stars and flowers, stupendous glaciers and crystal snowflakes - every form of animate or inanimate existence, leaves its impress upon the soul of man."
~Orison Swett Marden

Reminder: Don't forget you can enter giveaway week 3 through midnight EST Thursday night. Click here for the link.

Today my friend, Natalie, showed me how to make the coolest 3-D snowflake out of paper!

It looks incredibly complex and intricate, but it's SOOO simple to make, so I just had to share with you!

First gather your equipment
a pair of scissors, 6 pieces of paper, tape and/or a stapler.

Start with a square piece of paper.
Since I used regular copy paper, I had to turn it into a square.

Fold the square in half diagonally to form a triangle.

Then fold the triangle in half to form a smaller triangle.


Cut 4 diagonal slits along the bottom folded edge almost to the side folded edge (I stopped about a quarter of an inch away). They should be fairly evenly spaced. I just eyeballed mine but I've drawn lines here to illustrate where you should cut. Then it occurred to me if you were doing this with kids you could draw the lines on with pencil for them so that they could cut them themselves (with safety scissors and adult supervision of course!) Make sure you don't cut the slits all the way through, stop short of the other side.


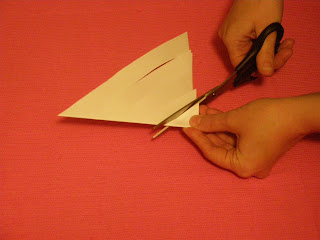

After you've cut the slits, carefully open your square up. You should see a pattern of nested diamonds like this:


Next, you're going to connect the points of the diamonds starting with the inner most and working your way out, alternating sides. Here I've labeled the points to illustrate.

Fold points A together and tape or staple them, like so:
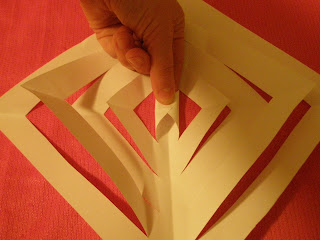
Then flip your square over and fold points B together and connect.

Flip the square back over to the front and fold points C together and continue connecting the points alternating sides


until you have a figure that looks like this:

Repeat these steps with the other 5 pieces of paper so that ultimately you have 6 sections.

Attach the 6 sections together at the sides to form a chain. Again you could staple, tape, or even glue them, but I found stapling to be easiest.
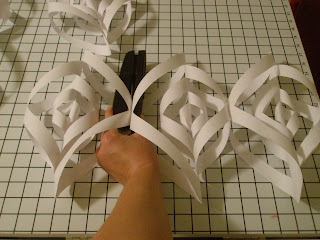

You *could* stop here and you'd have a really cool garland, especially if you used some colored paper,but for a snowflake you have to keep going!

Wrap your chain around to form a circle and attach the 1st and 6th sections together at the sides.
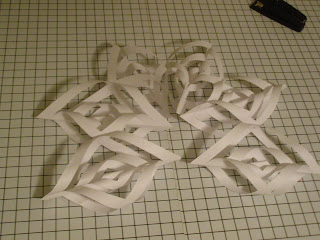
Finally, connect the points in the center
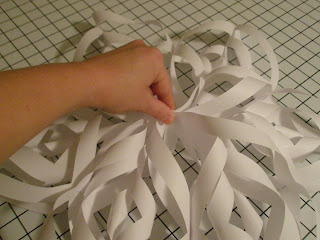

and you have your snowflake! Punch a hole in one of the points, tie on some ribbon, and hang it up for all to enjoy!


How cool would it be to make all different sizes, hang them from the ceiling and have your very own snowstorm! I'm telling you, the picture doesn't do it justice. You HAVE to make one and see for yourself how amazing these are!